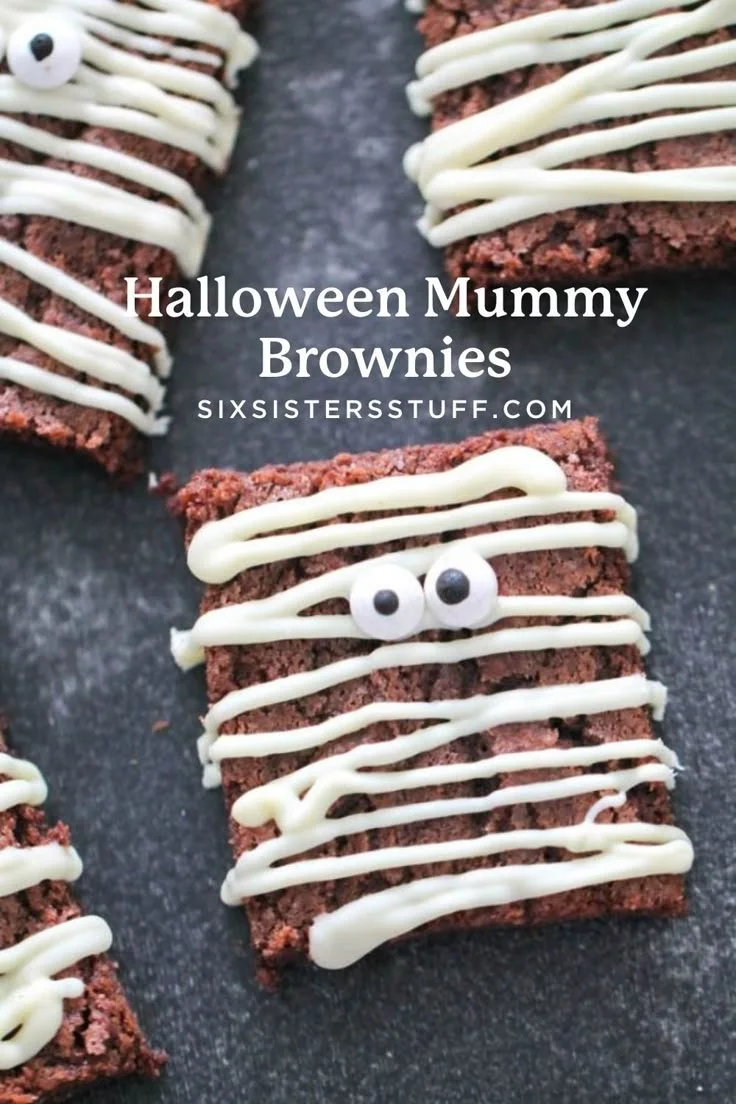
Halloween Mummy Brownies are a fun and creative dessert idea that brings a playful twist to your festive celebrations. These indulgent treats feature a rich brownie base topped with a smooth layer of white chocolate, giving them their legendary mummy appearance. Not only are they delightful to look at, but they also offer a perfect balance of flavors that will brighten up your Halloween gathering.
Why You’ll Love Halloween Mummy Brownies
- Easy to Make: This recipe uses simple ingredients and straightforward steps, making it perfect for beginners.
- Customizable Design: Get creative with the mummy’s appearance by altering the piping style or using different candies.
- Fun for All Ages: These brownies are great for kids and adults alike, perfect for Halloween parties or classroom treats.
- Deliciously Rich Flavor: The combination of chocolatey brownies and creamy white chocolate prevents them from being overly sweet.
- Perfect for Sharing: With their fun design, these brownies are an instant hit, making them ideal for sharing with friends and family.
Recipe Overview
- Prep Time: 15 minutes
- Cook Time: 25–30 minutes
- Total Time: Approximately 50 minutes
- Servings: 24 brownies
- Difficulty Level: Easy
Ingredients You’ll Need for Halloween Mummy Brownies
-
Brownie Base:
- 1 ½ cups butter (melted)
- ¾ cup cocoa powder
- 3 cups sugar
- 6 eggs (beaten)
- 1 ½ teaspoons vanilla extract
- ¾ teaspoon salt
- 2 ¼ cups all-purpose flour
-
Mummy Decoration:
- 2 cups white chocolate chips (melted)
- 48 candy eyeballs
Note: You can substitute dark chocolate for cocoa powder if a deeper chocolate flavor is desired.

How to Make Halloween Mummy Brownies
-
Preheat the Oven
Preheat your oven to 350°F (175°C). This ensures even baking for your brownies. -
Mix Butter and Cocoa
In a large mixing bowl, whisk together the melted butter and cocoa powder until well blended. -
Add Sugar and Eggs
Stir in the sugar, beaten eggs, vanilla extract, and salt. Mix thoroughly until the mixture is smooth. -
Combine with Flour
Gently fold in the all-purpose flour using a spatula. Be careful not to overmix—stop once the flour is just incorporated. -
Spread in the Pan
Pour the brownie batter into a greased 12 x 17 inch cookie sheet, spreading it evenly. -
Bake
Bake in the preheated oven for 25-30 minutes. The brownies are done when a toothpick inserted into the center comes out with a few moist crumbs. -
Cool and Cut
Allow the brownies to cool in the pan before cutting them into squares. -
Melt White Chocolate
Place the white chocolate chips in a microwave-safe bowl. Microwave for about 2 minutes, stirring until smooth. -
Decorate the Brownies
Pour the melted white chocolate into a piping bag, cut off one corner, and drizzle over the brownies to create "bandages." -
Add Candy Eyes
Press two candy eyeballs onto each brownie while the white chocolate is still warm. Let the decoration set before serving.
Tips for Success
- Don’t Overmix: Keep the batter mixing to a minimum after adding flour to maintain a chewy brownie texture.
- Allow Proper Cooling: Ensure the brownies cool completely before decorating to prevent the white chocolate from melting.
- Use High-Quality Chocolate: For the best flavor, use quality cocoa powder and chocolate chips.
- Keep an Eye on Baking Time: Ovens can vary; check your brownies a couple of minutes before the minimum time.
- Experiment with Shapes: Turn your brownies into Halloween ghosts or other shapes for added fun.
Easy Variations
- Nutty Brownies: Add 1 cup of chopped nuts like walnuts or pecans to the brownie batter for added crunch.
- Spiced Up Brownies: Incorporate a teaspoon of cinnamon or a pinch of cayenne into the brownie mix for a subtle spice twist.
- Go Wild with Toppings: Instead of white chocolate, use colored candy melts and sprinkle edible glitter for a festive look.
- Healthier Brownies: Swap half of the butter with unsweetened applesauce for a healthier option (note that texture may vary).
- Brownie Bars: Bake the batter in a square or rectangular pan for thicker bars, adjusting the baking time accordingly.
What to Serve with Halloween Mummy Brownies
- Milk or Hot Chocolate: The rich brownies pair wonderfully with a glass of cold milk or a warm cup of hot chocolate.
- Seasonal Fruits: Serve with slices of crisp apples or pears to complement the sweetness of the brownies.
- Ice Cream: Vanilla or pumpkin spice ice cream creates a delicious dessert combination.
- Caramel Sauce: Drizzle caramel on top or serve as a dip for an extra layer of flavor.
- Coffee: A robust coffee balances the sweetness, making it great for adult gatherings.
Storage and Reheating
- Room Temperature: Store the brownies in an airtight container at room temperature for up to 4 days.
- Refrigerator: If you prefer a firmer texture, refrigerate the brownies for up to a week.
- Freezer Storage: For longer storage, wrap cooled brownies tightly in plastic wrap and freeze for up to 3 months. Thaw in the refrigerator before enjoying.
- Reheating: Warm brownies in the microwave for about 15-20 seconds to soften them up if they become too firm.
Common Mistakes to Avoid
- Underbaking: Ensure the brownies are cooked thoroughly; they should be set around the edges and slightly soft in the center.
- Cutting Too Soon: Let the brownies cool completely in the pan before cutting to maintain a clean edge.
- Skipping Piping Bags: If you don’t have a piping bag, using a ziplock bag with a corner cut off works just as well.
- Overlooking Ingredients: Measure your ingredients carefully for the best results.
Halloween Mummy Brownies: Background & Cultural Inspiration
Brownies are a beloved treat, originally created in the late 19th century in the United States. Their dense texture and rich flavor make them a favorite for dessert lovers. The concept of decorating brownies to match Halloween themes adds a layer of creativity and fun, transforming a classic treat into a festive delight. The use of white chocolate as a decorative topping not only enhances the visual appeal but also showcases how sweets can be transformed for celebrations, guiding families in making special memories during the holiday season.
Frequently Asked Questions
Can I make these brownies ahead of time?
Yes! These brownies can be made a day or two in advance. Just be sure to store them in an airtight container.
What if I don’t have candy eyeballs?
If candy eyeballs are unavailable, you can use mini chocolate chips or M&M’s for a similar effect.
Can I use a different type of chocolate?
Absolutely! Swap out white chocolate for milk or dark chocolate for a different flavor profile.
Can I freeze the brownies after decorating?
It’s best to freeze the brownies before decoration. Decorated brownies may lose their texture; however, you can freeze the undecorated brownies and decorate them after defrosting.
How do I know when my brownies are done?
Brownies are done when the edges are set and a toothpick comes out with just a few moist crumbs, ensuring they remain fudgy inside.
Final Thoughts
Halloween Mummy Brownies offer a delightful combination of rich flavor and festive fun, making them a perfect addition to any Halloween celebration. Easy to make and customizable, they become not only a treat to eat but also a creative outlet for decorating. Whether you’re serving them at a party or celebrating at home, these brownies are sure to bring joy to all ages. So gather your ingredients and start creating a spooky yet delicious dessert that will leave everyone smiling.
PrintHalloween Mummy Brownies
Fun and creative brownies topped with white chocolate to resemble mummies, perfect for Halloween celebrations.
- Prep Time: 15 minutes
- Cook Time: 30 minutes
- Total Time: 45 minutes
- Yield: 24 brownies
- Category: Dessert
- Method: Baking
- Cuisine: American
- Diet: Vegetarian
Ingredients
- 1 ½ cups butter (melted)
- ¾ cup cocoa powder
- 3 cups sugar
- 6 eggs (beaten)
- 1 ½ teaspoons vanilla extract
- ¾ teaspoon salt
- 2 ¼ cups all-purpose flour
- 2 cups white chocolate chips (melted)
- 48 candy eyeballs
Instructions
- Preheat your oven to 350°F (175°C).
- Mix together the melted butter and cocoa powder until well blended.
- Stir in the sugar, beaten eggs, vanilla extract, and salt until smooth.
- Fold in the all-purpose flour gently with a spatula.
- Pour the brownie batter into a greased 12 x 17 inch cookie sheet.
- Bake in the preheated oven for 25–30 minutes.
- Allow the brownies to cool in the pan before cutting.
- Melt the white chocolate chips and drizzle over the brownies.
- Press candy eyeballs onto each brownie.
Notes
Allow brownies to cool completely before decorating to prevent white chocolate from melting.