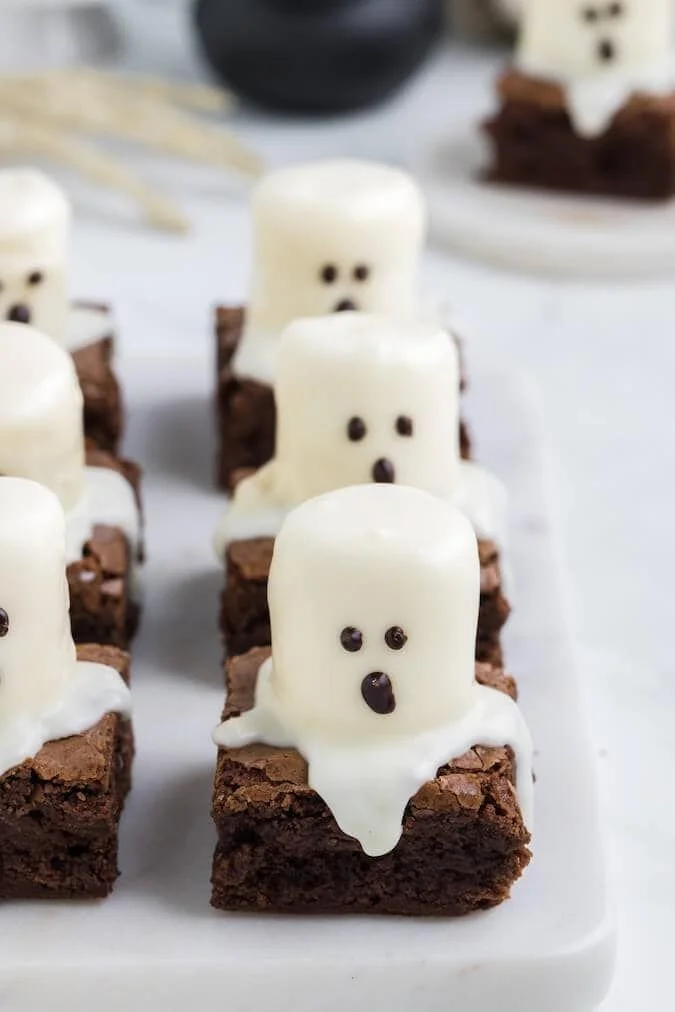
If you’re looking for a fun and festive treat to make with the family, these Easy Ghost Brownies are a perfect choice. Not only are they adorable, but they’re also incredibly simple to whip up, making them an excellent option for both kids and adults alike. With just a few ingredients and minimal effort, you can bring a spooky touch to your dessert table.
Why You’ll Love Easy Ghost Brownies
- Quick to Prepare: These brownies come together quickly, making them a fantastic last-minute dessert option for parties or gatherings.
- Kid-Friendly Fun: Involve the kids in the decorating process! Piping the chocolate faces on the marshmallow ghosts is a delightful way to bond and spark creativity.
- Comforting Dessert: Brownies deliver that ultimate sweet comfort, and adding ghosts turns them into a festive treat anyone can enjoy.
- Simple Ingredients: With only a handful of easily accessible ingredients, you can create a delicious dessert without multiple trips to the store.
- Versatile Treat: These brownies can be enjoyed for Halloween or any other festive occasion, making them a great recipe to have on hand year-round.
Recipe Overview
- Prep Time: 15 minutes
- Cook Time: 30 minutes
- Total Time: 45 minutes
- Servings: 16 brownies
- Difficulty Level: Easy
Ingredients You’ll Need for Easy Ghost Brownies
- Brownie Base:
- 1 (18 oz) box of brownie mix (plus ingredients listed on the package)
- For the Ghosts:
- 16 large marshmallows
- 1 (10 oz) bag of white melting wafers (about 1 1/2 cups)
- 1/4 cup semisweet chocolate chips
Notes:
- The brownie mix serves as a cozy base, perfect for adding flavors and textures.
- Feel free to use different brands of melting wafers; they all work well for this recipe.
- You can substitute the semisweet chocolate chips with milk chocolate or dark chocolate for a different taste.

How to Make Easy Ghost Brownies
-
Prepare the Brownies:
Follow the instructions on the brownie mix package. Pour the batter into a greased 9×9 inch pan and bake as directed. Allow the brownies to cool completely on a wire rack. -
Cut into Squares:
Once cooled, cut the brownies into 16 squares. This will serve as the base for your ghostly figures. -
Prepare the Baking Sheet:
Transfer the brownie squares onto a baking sheet lined with parchment paper, leaving about an inch of space between each square. This will ensure easy decorating. -
Melt the White Chocolate:
Microwave the white melting wafers according to the package instructions. Stir until smooth and completely melted. -
Create the Ghosts:
Dip the flat side of each marshmallow into the melted white chocolate. Position the marshmallows upright in the center of each brownie square. The melted chocolate will act as glue to keep them in place. -
Coat the Marshmallows:
Using a spoon, drizzle additional melted white chocolate over the marshmallows, allowing it to cascade down the sides of the brownies. This gives the appearance of ghostly drips! -
Let Set:
Allow the brownies to sit until the white chocolate hardens completely. This usually takes about 20-30 minutes. -
Prepare Chocolate Eyes:
In a microwave-safe bowl, melt the semisweet chocolate chips in 15-second intervals, stirring in between, until smooth. -
Add Faces:
Transfer the melted chocolate to a piping bag or a zip-top bag with a small hole cut from the corner. Pipe two eyes and a mouth on each marshmallow to create your ghost faces. -
Final Touches:
Allow the chocolate faces to set on the marshmallows before serving. Enjoy your spooky treats!
Tips for Success
- Cool Brownies Completely: Ensure the brownies are cool before cutting; this prevents messy edges and allows for easy glazing.
- Melt Chocolate Carefully: When melting wafers and chocolate, do it slowly to avoid burning and to ensure a smooth consistency.
- Space Out the Marshmallows: Don’t overcrowd the baking sheet with brownies; leaving space allows for easier drizzling and decorations.
- Reheat Chocolate Gradually: If your melting chocolate hardens, you can gently reheat it in the microwave in short intervals.
Easy Variations
- Use Different Brownie Flavors: Experiment with flavored brownie mixes, such as caramel, peanut butter, or even red velvet for a twist.
- Add Sprinkles: Use Halloween-themed sprinkles to enhance the festive appearance of your brownies.
- Chocolate Ghosts: Instead of white chocolate, use dark or milk chocolate to coat the marshmallows for a richer flavor.
- Include Candy Eyes: For a more whimsical look, use candy eyes instead of chocolate to decorate the marshmallow ghosts.
What to Serve with Easy Ghost Brownies – Make these with your kids!
- Hot Cocoa: Pair these brownies with a warm cup of hot cocoa for a cozy, delightful treat, especially during chilly nights.
- Vanilla Ice Cream: A scoop of vanilla ice cream adds a creamy balance to the chocolatey richness of the brownies.
- Fruit Salad: Serve alongside a fresh fruit salad to contrast the sweetness and rich flavors of the brownies.
- Pumpkin Spice Latte: Match the seasonal spirit by serving with a festive pumpkin spice latte for an autumnal treat.
Storage and Reheating
- Refrigerator Storage: Store leftovers in an airtight container in the fridge for up to a week. Allow to come to room temperature before serving.
- Freezer Storage: For longer storage, freeze the brownies in an airtight container for up to 3 months. Thaw overnight in the refrigerator before enjoying.
- Best Reheating Method: If desired, microwave individual brownies on low for about 10-15 seconds until slightly warm to enjoy the fudgy texture.
- Meal Prep Note: Brownies are best when made fresh, but you can prepare the brownie base in advance and add the marshmallow ghosts closer to serving time.
Common Mistakes to Avoid
- Skipping Cooling Time: Ensure brownies are completely cool before applying marshmallows and chocolate to avoid melting.
- Overheating Chocolate: Be cautious not to overheat the chocolate while melting, as this can cause it to seize or become lumpy.
- Not Leaving Space: Crowding the brownies on the baking sheet can lead to difficulties in decorating and may cause them to stick together.
- Rushing the Setting Process: Allow enough time for the white chocolate to set; this makes for cleaner and more presentable ghosts.
Easy Ghost Brownies: Background & Cultural Inspiration
Ghost brownies are a fun Halloween-themed treat that combines the classic brownie with festive marshmallow decorations. Brownies themselves have a rich history, originating in the United States in the late 19th century. They became popular as a convenient handheld dessert, especially enjoyed during gatherings and parties. The addition of ghost decorations taps into both the Halloween spirit and the joy of creativity in the kitchen, making these brownies a favorite for family activities and holiday celebrations.
Frequently Asked Questions
Can I make these brownies in advance?
Yes, you can make the brownies a day or two in advance. Decorate them with marshmallows and chocolate closer to serving time to maintain their appearance.
How should I store leftover brownies?
Leftover brownies should be stored in an airtight container at room temperature for up to three days or in the refrigerator for about a week.
Can I use homemade brownies instead?
Absolutely! Feel free to use your favorite brownie recipe instead of a box mix for a homemade touch.
How do I fix melted chocolate that has seized?
If your melted chocolate seizes, try adding a small amount of vegetable oil to it while stirring, which can help restore its smooth consistency.
Are there any gluten-free alternatives for the brownie mix?
Yes, there are various gluten-free brownie mixes available, or you can make gluten-free brownies from scratch using almond flour or gluten-free all-purpose flour.
Final Thoughts
Easy Ghost Brownies are not just a treat; they’re a delightful way to celebrate the season while creating lasting memories in the kitchen. With their simple preparation and fun decorating potential, these brownies are sure to be a hit at any gathering. So grab your ingredients and get ready to create some delicious, spooky desserts that will charm both kids and adults alike!
PrintEasy Ghost Brownies
Fun and festive treats that combine classic brownies with adorable marshmallow ghosts, perfect for Halloween or any celebration.
- Prep Time: 15 minutes
- Cook Time: 30 minutes
- Total Time: 45 minutes
- Yield: 16 brownies
- Category: Dessert
- Method: Baking
- Cuisine: American
- Diet: Vegetarian
Ingredients
- 1 (18 oz) box of brownie mix (plus ingredients listed on the package)
- 16 large marshmallows
- 1 (10 oz) bag of white melting wafers (about 1 1/2 cups)
- 1/4 cup semisweet chocolate chips
Instructions
- Prepare the brownies: Follow the instructions on the brownie mix package. Pour the batter into a greased 9×9 inch pan and bake as directed. Allow the brownies to cool completely on a wire rack.
- Cut into squares: Once cooled, cut the brownies into 16 squares. This will serve as the base for your ghostly figures.
- Prepare the baking sheet: Transfer the brownie squares onto a baking sheet lined with parchment paper, leaving about an inch of space between each square.
- Melt the white chocolate: Microwave the white melting wafers according to the package instructions. Stir until smooth and completely melted.
- Create the ghosts: Dip the flat side of each marshmallow into the melted white chocolate. Position the marshmallows upright in the center of each brownie square.
- Coat the marshmallows: Using a spoon, drizzle additional melted white chocolate over the marshmallows, allowing it to cascade down the sides of the brownies.
- Let set: Allow the brownies to sit until the white chocolate hardens completely, about 20-30 minutes.
- Prepare chocolate eyes: In a microwave-safe bowl, melt the semisweet chocolate chips in 15-second intervals, stirring in between.
- Add faces: Transfer the melted chocolate to a piping bag and pipe two eyes and a mouth on each marshmallow.
- Final touches: Allow the chocolate faces to set on the marshmallows before serving.
Notes
Feel free to use different brands of melting wafers or substitute semisweet chocolate chips with milk or dark chocolate for variations.